Featured Post Today
print this page
Latest Post
Showing posts with label Snowboarding lesson. Show all posts

On-the-snow Ski and Snowboard education Kid

Kids Signature Programs

Our Kids Signature Programs offer just the right mix of fun and education; the perfect balance for getting young ones started on the slopes. By limiting class sizes to five students or fewer, we give your child more personalized attention with more time to play, more time to practice and more time to learn.
And remember: any time you sign your children up for lessons, you’ll enjoy 20% off equipment rentals at Park City Mountain Rentals.
In a continued effort to maximize the safety and wellbeing of our Ski & Snowboard School guests, we’re requiring all participants aged 17 and younger to wear a helmet. Helmets are available for purchase in Legacy Sports or can be rented for an additional charge at Park City Mountain Rentals.
For even more tips on how to have fun and be safe on the mountain, click here.


Signature 5 Program

Designed for children aged 6 - 14, our Signature 5 Program continues to provide a safe, fun and exploratory learning environment while guaranteeing a class size of five students or fewer. And move over, cafeteria food: kids in Signature 5 Programs even get to choose their own lunch from one of our on-mountain restaurants. » More
Reserve Now

Kids Signature 3

Even the smallest skiers can enjoy the mountain with our Signature 3 Program. We blend on-mountain instruction with fun, indoor activities at our Kids Mountain School. Students aged 3 ½ to 5 start on the magic carpet, then once they’re ready, move to the First Time lift. Classes are always limited to a maximum of three students per instructor to ensure plenty of personal attention. We also offer a Kids Signature 3 Snowboard Program with the same dedicated, hands-on instruction for children aged 5 to 6. » More
Reserve Now

Teen Select

Do the mountain your way, and hang out with skiers or snowboarder your age (15-17 year olds), in our brand new Teen Select program. Explore the whole mountain and more with your crew over the course of a full day: from greens to groomers, powder-filled bowls to our one-of-a-kind Signature Runs® – it's all up to you and your group. Even get off the mountain and into downtown Park City for lunch if you want! » More
Reserve Now

I Ride Park City Camps

For skiers and snowboarders who want to up the park and pipe ante, we offer a three-day “I Ride Park City” Freestyle Camp for kids aged 11 to 15. Campers will snag sessions in both public and private progression parks, attentive, hands-on coaching and time in our digital media lab to experiment with the images and video they’ve captured over three days. “I Ride Park City” Camps are offered select weeks throughout the season. » More
Reserve Now

Kids Private Lessons

Give the kids something to brag about. At Park City Mountain Resort, we maximize opportunities for success, whether you're just learning or a seasoned skier/rider. A personal coach will help perfect techniques, make changes and assist your child in becoming the skier or rider you've always dreamed they could be. Help your kids reach their peak.
More

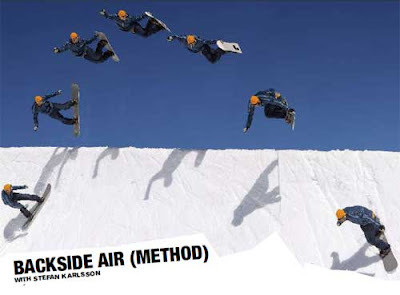
Snowboarding Trick : Backside Air (Method)

Snowboarding Trick : Backside Air (Method)
with Stefan Kar lsson

How to Snowboarding Backside Air (Method). Like frontside’s, the backside air is a move you learn from day one, and spend the rest of your life refining and pushing. The Method air is basically a backside air with extra tweak – old school, but a timeless expression of style. Christian Hosoi perfected them in the eighties on a skateboard, Jamie Lynn did the same on snow in the nineties...and as soon as you’re getting some

How to Snowboarding Trick Backside Air (Method)
 Backside Air (Method) Tip : If the pipe is a bit unpredictable, stay low and relaxed while riding up the wall, you’ll feel the transition better, then stiffen up at the top, ready to pop.
 How to Snowboarding Trick Backside Air (Method)
 How to Snowboarding Trick Backside Air (Method)
 Snowboardng Trick : Backside Air (Method)
  • Getting the line right in the flat bottom is the key to doing this trick right, so you don’t need to turn once you’re on the transition.
  • Head up the transition flat on your base, knees bent, with some weight on the heel edge.
  • If the pipe wall is not steep (under-vert), you need to ollie more off the lip. If it is close to vertical, just ride out without popping.
  • As the board leaves the lip, lean back a little, lift the nose and let the board come to your hand – don’t go to the board.
  • Grab the backside edge with your leading hand. I f it feels right, tweak it out by pulling the board in with your hand, and pushing out the back foot.
  • Spot your landing. Pull your board back in underneath you, release the grab, and extend your legs to meet the top of the transition.
  • Land flat based with weight over your toe edge, and ride away clean.

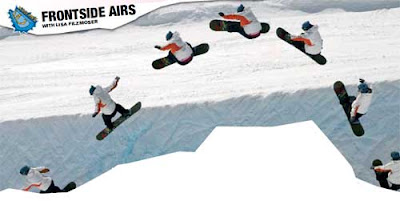
Snowboarding Trick : Frontside Airs

How to Snowboarding Trick Frontside Airs
Snowboarding Trick : Frontside Airs
with Lisa Fi lzmoser

How to Snowboarding Frontside Airs, The best thing about frontside airs is that they’re such an easy trick to learn, and once you’ve got them, you spend the rest of your life finding new ways to do them, new places to try them, and new heights to take them. Here, we
How to Snowboarding Trick Frontside Airs
Snowboarding Trick : Frontside Airs Tip :  Lean back slightly as you take off to keep your weight inside the pipe. How hard to pop the ollie at takeoff depends on the vert (steepness). More vert = less pop.
How to Snowboarding Trick Frontside Airs

Snowboarding Trick : Frontside Airs
  • Decide your line on the flat bottom, and stick with it. Aim to leave the pipe at around 45° from vertical.
  • Approach the frontside wall with as much speed as you feel happy with.
  • Ride up the wall, weight over your toe edge, gradually becoming more flat on your base, and focus on the lip.
  • As you leave the pipe, pop a small ollie, turn your head and shoulders to face down the pipe, and pull your feet up in front of you.
  • Grab frontside, and straighten out your front leg.
  • Holding the tweak, start looking down at the lip, and get ready for re-entry.
  • Pull your front leg back in, and touch down on the pipe wall. Aim to land just below the lip.
  • Ride out flat-based, then quickly transfer to your heel-edge, ready to line up for the backside wall...

Snowboarding Trick : Droping In

Snowboarding Trick : How To Snowboarding Droping In
Snowboarding Trick : Droping In
with Paulina Ligocka

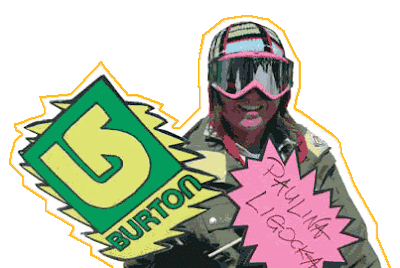
How To Snowboarding Droping In, While not a trick as such, dropping in is one thing that has to be mastered before much progress is made: it is the key to understanding transition, and how it can give us extra speed.
There are two ways to ride into a halfpipe – backside or frontside. First to learn is backside, because it’s a) easier, and b) sets you up for a frontside air onyour first hit.

The mistake most riders make is ‘dropping’ when they should be ‘riding’ into the transition.
They jump away from the wall and land with a bump halfway down the transition, which
puts them off balance and kills speed.
Snowboarding Trick : How To Snowboarding Droping In
Snowboarding Trick : Droping In Tip
Picture in your mind how you’re going to hug the wall of the pipe as you go down, and squeeze speed as you leave.
Snowboarding Trick : How To Snowboarding Droping In
 Snowboarding Trick : How To Snowboarding Droping In

Snowboarding Trick : Droping In
  • Select a spot without too much vert or bumps in the transition.
  • Ride along the lip to build up a little speed, and spot your entry point.
  • Lean into the pipe and pop a little ollie, pulling your knees up high to enter the pipe
    well tucked.
  • As soon as your weight is fully inside the pipe, extend your legs to meet the pipe wall.
  • Ride down the wall compact, and as you hit the transition, push with both feet to pump, then, staying on your toe edge, set up for a frontside air.

Snowboarding Trick : How To Snowboarding Frontside boardslide

Snowboarding Trick : How To Snowboarding Frontside boardslide

Snowboarding Trick : Frontside boardslide
with Thomas Harstad

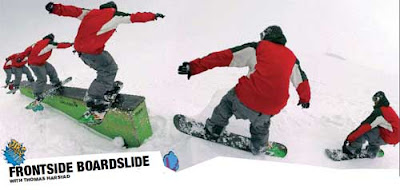
How To Snowboarding Fronside boardside, Frontside boardslides are THE classic rail trick, reason being they are the simplest, most stylish way to get down a rail, period. As for difficulty... this is one to try when you’re comfortable with boardslides and nose slides.
Snowboarding Trick : How To Snowboarding Frontside boardslide


Snowboarding Trick : Frontside boardslide Tip
It’s the sliding position that needs loads of practice – do frontside butters everywhere.
Snowboarding Trick : How To Snowboarding Frontside boardslide
 Snowboarding Trick : How To Snowboarding Frontside boardslide

Snowboarding Trick : Frontside boardslide
  • Approach the rail straight on, or slightly from the side, shoulders parallel to the board.
  • As you reach the take-off, pop a small ollie, and focus on your landing point on the box.
  • Turn the board backside, aiming to land on the rail at 90°, while keeping your shoulders in line with the rail – basically like a backside shifty.
  • Land, weight centred over the board, or slightly more on the front foot.
  • Keep looking down the rail, at the same time tweaking the board in the opposite direction with your feet.
  • Keeping your head and shoulders facing down the rail will help your balance, and help you ride out clean.
  • As you leave the rail, counter-rotate your shoulders and hips to ride out facing forwards.
Snowboarding Trick : and How To Snowboarding
Snowboarding Trick : Jibs
How to 50-50How to Bomb Drops
How to BoardslidesHow to Rock to Fakie
How to Frontside Boardslide

Snowboarding Trick : How To Snowboarding Frontside boardslide Video


Snowboarding Trick : Rock to fakie

How to Snowboarding  Trick : Rock to fakie
Snowboarding Trick : Rock to fakie
with Tadej Valentan

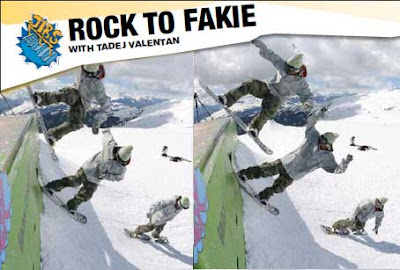
How to Snowboarding Rock to Fakie, this is pretty much the first trick to try on a wall ride. You start out just sliding a little way, straight up and down. As your confidence increases, work up to the coping. Once you have it, try hitting the wall at a slight angle, and sliding along the coping.

How to Snowboarding  Trick : Rock to fakie
 
Snowboarding Trick : Rock to fakie Tip :
Shoulders parallel to your board, and stay flat on your base at all times.

How to Snowboarding  Trick : Rock to fakie

How to Snowboarding  Trick : Rock to fakie


Snowboarding Trick : Rock to fakie
  • The most important thing is to get the speed right: enough to reach the coping, plus a little more to ‘rock’ your weight over the top.
  • Approach the wall flat on your base, and keep your eye on the coping.
  • As your foot passes the coping, start to straighten out your front leg.
  • Aim to stop with the middle of your board on the coping, then lean forward to rock over the top.
  • Keep your shoulders parallel to the board, and your eyes on your feet.
  • To complete the move, do everything in reverse, riding back down fakie.
  • Keep your eyes on your feet, and as soon as you touch the snow, turn your head to face the direction you’re travelling.

Snowboarding Trick : Bomb Drops

Snowboarding Trick : Bomb Drops
with Paulina Ligocka

How to Snowboarding a Bomb Drop, basically Bomb Drops means dropping from a stationary standing position to the ground below. As well as being fun and challenging, they also come in handy if you ever find yourself stuck above a rock band in the backcountry. Or in a burning building.
Snowboarding Trick : Bomb Drops

Snowboarding Trick Bomb Drops Tip :
 Be confident. If you lean back too much out of fear you’ll take all the impact on the back leg, so keep your weight centred.
Snowboarding Trick : Bomb Drops

Snowboarding Trick : Bomb Drops

Snowboarding Trick : Bomb Drops
  • Find a good spot: make sure the ledge you are standing on is stable and has some traction, so you don’t slip as you jump off. Also make sure the landing has a little transition to land in.
  • Look down and focus on the spot you’re aiming for. Visualise the take-off, drop, and landing.
  • Get down low, lean a little bit forward, and push equally off both feet.
  • Pull your feet up into your body, keeping your eyes on the landing spot at all times, and grab.
  • As you’re coming in towards the landing, extend legs to meet the ground, and get ready to absorb the shock of landing flat.
  • Land, soak up the impact, and ride away.

Snowboarding Trick : 50-50’s

Snowboarding Trick : 50-50’sSnowboarding Trick : 50-50’s
with Jenny Jones

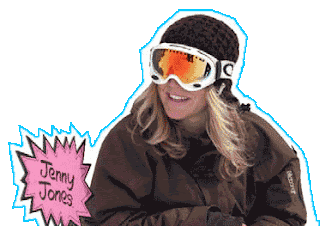
To the rookie park rider, rails and boxes are the scariest thing ever. But don’t worry, they aren’t half as dangerous as they look. Most snowparks have at least one small, wide box for you to build confidence on, and master the basics.
How To Snowboarding 50-50's, The 50-50 is one of the building blocks of jibbing, and describes riding along an obstacle with both feet directly over the rail. It’s usually the first thing you will try on a jib, as you are basically just riding over it.
Snowboarding Trick : 50-50’s


Snowboard Trick - 50-50’s Tip :
Stay smooth and loose getting onto the rail, and keep your shoulders parallel to the rail as you slide.

Snowboarding Trick : 50-50’s
 Snowboarding Trick : 50-50’s

Snowboard Trick - 50-50’s
  • The most important thing is to be balanced on the take-off, so check the run-in and kicker is flat and smooth.
  • Approach the obstacle with medium speed, and an “I can do this” attitude.
  • Keep your shoulders parallel to the board, and ride straight towards the box – no speed checking.
  • At the take-off, pop a small ollie, just high enough to make it onto the box.
  • Land on the box and focus on the end, this will help you reach it!
  • Relax, knees bent, and keep your shoulders parallel to the rail. This will keep you straight.
  • Lift your nose slightly as you ride off the end, and land centred and flat on your base.


Snowboarding Trick : Boardslides

How to Snowboarding Trick : Boardslides
Snowboarding Trick : Boardslides
with Lisa Filzmoser

How to Snowboard Boardslides ?,..Once you have 50-50’s wired, it’s time to turn the board around 90 degrees and start sliding that bad boy like a real snowboarder... The boardslide is actually easier to come out of fakie, so that’s what we’re doing here.
How to Snowboarding Trick : Boardslides

Snowboarding Trick - Boardslides Tip: 
Keep the base flat and your weight centred, and you’ll be fine.
How to Snowboarding Trick : Boardslides

How to Snowboarding Trick : Boardslides

Snowboarding Trick :Boardslide To Fakie
  • Approach the box straight on, or slightly from the side on your heel edge – whichever feels more comfortable.
  • Pop a small ollie, and turn your whole body 90 degrees to face the rail.
  • Land on the box with your board at 90°, body facing forwards, weight centred over the box.
  • Look down the rail for the end, and relax your upper body.
  • If you turned a full 90° jumping on, as you reach the end your body will naturally want
  • to keep turning in the same direction.
  • Sliding off the rail, slide the tail around to forwards and ride out fakie.
How to Snowboarding Trick : Boardslides
 Snowboarding Trick : Boardslide (not pictured)
Coming out of a boardslide forwards or backwards is controlled by your shoulders. Doing a regular boardslide is slightly more difficult: you have to keep your shoulders parallel to the box, turning more at the hip. This will help your board come away forwards again.

Snowboarding Trick : Frontside 360’s

Snowboarding Trick : Frontside 360’s
with Nico Droz

How To Snowboarding Frontside 360’s, Like the backside 180, the frontside 3 is a classic: a trick that you can learn early on, and spend the rest of your life trying to perfect… Done well, it’s one of the most stylish moves in the book: done badly, it’s one of the ugliest. Frontside three’s are more tricky than backside because they are a blindside rotation.

Snowboarding Trick : Frontside 360’s

Snowboarding Trick - Frontside 360’s Tip:
When learning this trick, you may find yourself landing at 270 onto your toe edge every time. This is usually because you are opening up from the rotation too early, so stay tucked up small!

Snowboarding Trick : Frontside 360’s
 Snowboarding Trick : Frontside 360’s 
  • Approach the kicker straight on, slowly leaning into a heelside edge as youapproach the lip.
  • As you reach the lip, turn your head and shoulders frontside, to begin the rotation. Pop off the heelside edge.
  • As you take off, quickly pull the board up into your body, grabbing your toe edge between your knees with the back hand.
  • As you rotate, keep looking in the direction you are going. If you feel you are spinning slowly, stay tight. If not, bone out your front leg to slow the rotation.
  • After 270°, start looking down between your feet to spot your landing and stall the rotation. Get ready to land.
  • Let go of the grab at the last possible moment, and bring your board around the last 90 degrees.
  • Land as flat on your base as possible, turn your head to look down the landing, and ride away.

Snowboarding Trick : How To Frontside 360’sVideo

Snowboarding Trick : Backside 360’s

Snowboard Trick : Backside 360’s
with Jenny Jones

How To Snowboarding Backside 360's, Pulling your first 360 is one of those sweet moments you’ll remember forever – now you’re a freestyler! Most riders learn the backside version first: it’s easier to initiate the rotation and spot the landing. Once you have them locked in, backside three’s feel great: some riders never feel the need to learn another move, while many pros use it as their ‘safety’ trick for the rest of their career.


Snowboard Trick - Backside 360’s Tip :
Don’t start your rotation too early, or press too hard on your toe edge as you ride up the kicker; both will cause you to drift. Instead, make a smooth, decisive turn with your shoulders as you leave the lip.

 
Snowboard Trick - Backside 360’s Tip :
  • A pproach the jump with a little more speed than you would a straight air, slightly on your heel edge.
  • As you ride up the kicker, switch from your heel to your toe edge.
  • As you take off, drop and turn your head and shoulders back towards the jump, and pop off your back foot,
  • While your head and leading arm are leading the rotation, drop your trailing arm, pull up your knees, and grab Indy.
  • Once you have completed the first 180°, you’ll already be able to see the landing.
  • Keep looking over your trailing shoulder to the landing.
  • As your board reaches 270°, release the grab, complete the rotation, and land.

Snowboarding Lesson In 10 Steps

So you've decided to try snowboarding. You've bought the gear, you've mounted the board... now it's time to learn to snowboard.
This article will take you through learning to snowboard in ten steps.
Each step is listed in order so that you may progress logically from one step to the next. You may even want to print this article and take it with you to the slopes as you learn to snowboard.

Learn to Snowboard :

Choosing Snowboarding Helmets Tips

Choosing a Snowboard Helmet

Very few serious snowboard injuries involve head trauma. It is usually just the high profile ones. Helmets give everyone a sense of security.
  • The beginner snowboarder will benefit from a snowboard helmet because it will protect the back of their head when catching an edge.
  • More advanced riders wear a snowboard helmet to protect against things like trees or impact when landing wrong off a jump.

When trying on a snowboard helmet, make sure it fits very snug and try on as many different models as you can. Some helmets offer more insulation than others, and you may end up wearing a thin cap under the helmet to stay warm, so if this is the case be sure to wear this when you are trying snowboard helmets on. We also suggest looking at snowboard helmets with removable earflaps and padding because they can help you regulate your temperature on cold or hot days.
 

Don't Take the Risk

Would you ride a bicycle in traffic or forty miles an hour down a hill without a bicycle helmet? Of course not. The statistics have proven time and again that bicycle helmets are as essential and necessary as seatbelts or airbags. Bicycle helmets are a law for riders under twelve years old.
Because snowboarding and skiing are sports done in the snow and away from other vehicle traffic, the statistics are less staggering, but should be taken as seriously. Only 15-24% of skiers and snowboarders wear helmets on the slopes, yet there are still unnecessary deaths each year.
Don't let yourself or your child fall victim to the invincibility mindset some dangerous skiers and riders have. Get a snowboard helmet.

Warm and Weathered

Not only are snowboard helmets the smartest snowboarding accessory you will buy for safety sake, they are also the best looking accessory. Snowboard helmets keep ears warm and heads ventilated, chins protected by guards, and come in low-profile styles and fun prints and colors.


ZELL AM SEE Best Skiing Snowboarding Destination

Here is an Alpine combination as compatible as beer and pretzels.

Zell am See photo, Kaprun photo, Europa Sports Region, Austria

Yes, these two neighboring resorts fit together hand in glove, like a finely tuned dance team where both partners have learned to subtly complement each other for the best possible performance. Above the low-key village of Kaprun, the Kitzsteinhorn glacier guarantees wide-open bowl skiing the year round, while the majority of Zell am See’s Schmittenhöhe slopes sweep down through the trees, more reminiscent of Colorado’s Breckenridge or classic New Hampshire trails.

Here is an interactive Zell am See town map.

Here is an interactive Kaprun town map.

Together they comprise the Europa Sports Region, a land rich with winter and summer outdoor activities. In the spring, high-energy types can ski in the morning and windsurf the lake in the afternoon. Austrian and European skiers have long known the Europa Sports Region as an ideal location for skiing. The area was one of the first resorts in Austria with descents recorded as far back as 1893.

Lake Zell serves as the region’s focal point. This long narrow body of water sprawls 13 km. along a picturesque valley shadowed by the Hohentauern, Austria’s highest mountain range. When the lake freezes in winter, towns-people fish through the ice, go ice-boating, or skate across Zell’s surface to the village of Thumers-bach on the other side.

Zell am See sits on a flat semicircular piece of land that juts into the lake, squeezed from the mountains ringing the shore. Cream-colored buildings huddle around the well-preserved 13th-century church of St. Hippolyt, and the Vogtturm (city tower) which dominate Zell’s skyline, giving it the air of a medieval mountain town rather than a bustling ski village. One could wander for hours through the town’s winding streets and have no trouble envisioning merchants and traders from bygone days going about their business.
Zell am See photo, Kaprun photo, Europa Sports Region, Austria

Today the streets are still lined with unpretentious shops—sport stores, well-stocked markets, intriguing crafts shops. You’ll also find cozy cafes, gasthauses and restaurants filled with locals and tourists alike. Zell am See, with a year-round population of almost 10,000, has honed the fine art of balancing the fantasy sought by tourists with the real needs of its citizens.

On the surface, Kaprun puts on a quieter face than does Zell am See, partly because it is much smaller in scale. But its laid-back atmosphere sets a more relaxing pace, and the village common gives it the air of a small New England college town. The Kitsteinhorn was Austria’s first glacial ski area.

On the mountain, Kaprun has completed a new Alpine Center at the top of the old Gletscherbahn.

Interactive maps copyright Schubert & Franzke

Snowboarding Trick : Backflips


 Snowboarding Trick : Backflips
 with Tadej Valentan

How To Snowboarding  Backflip, The backflip is the ultimate ‘crowd pleaser’ trick. Very impressive to look at, and really not that hard – it just takes plenty of balls to try it. Difficulty-wise, it’s about the same as a 360, yet even some pros admit they can’t (or won’t) do them. The main reason for learning backflips is that they are really fun to do on small, steep jumps.

Snowboarding Trick : BackflipsSnowboarding Trick : Backflips Tip:
The whippier the jump, the better. A steep takeoff makes the rotation easier, and grabbing will tuck your body up and help you keep the rotation fast. A soft powder landing is definitely where you try this trick for the first time.
Snowboarding Trick : Backflips
 Snowboarding Trick : Backflips
  • Ride towards your kicker/windlip/pile of snow.
  • Commitment is the key: start throwing yourself backwards as your front foot leaves the lip.
  • Pop hard off the tail, leaning backwards as you take off, and throw your head back to initiate the flip.
  • Pull your knees up into your body, and grab – Indy or Melon are easiest.
  • Keep looking upwards, staying tucked until you can see the ground.
  • Now you should be able to work out how much air time you’ve got to complete the rotation. Let go of the grab, open up your body to complete the rotation, and land.

 
Support : Creating Website | Johny Template | Mas Template
Copyright © 2011. Top 10 Snowboard - All Rights Reserved
Template Created by Creating Website Published by Mas Template
Proudly powered by Blogger