Featured Post Today
print this page
Latest Post
Showing posts with label How to Snowboard. Show all posts

Snowboard for Beginner : Step 5 Easy Tricks

Ollies: Ollies are a type of jump. You lean on your back foot and pull your front foot into the air. Once your front foot is in the air, push your back foot off the ground so that you are in mid-air.

Snowboard Ollie
Tick Tack: If you know how revert on a skateboard this should be easy. Lean on your back foot and pull your front foot in the air. Slide the font of your board to right while it is in the air and then put it back on the ground. Do the same, but instead slide your foot to left. Repeat left, right, left, right, left, right, left, right as long as you want to.

offcourse thats a wrong imagae :D
This Thingy: I'm not sure if this has a name. You lean back like you're turning, but do it really fast until it like you are going to stop. As you are doing this your back foot should slightly be digging into the snow. This will make snow fly everywhere. In new, fluffy snow there will be a whole cloud of snow around you.


180: To start you either need to Ollie or just jump. twist your body in mid-air making your snowboard spin. You should land switch. Landing sideways isn't a good idea. Make sure that either land level or on your back foot. ( the video is cheesy and lame, but it shows you the basics)

Frontside 180


SNOWBOARD FOR BEGINER
STEP 1 What is Equipments
STEP 2 How to Footing
STEP 3 How to Riding
STEP 4 How to Turning
STEP 5 Little Trick

Snowboard for beginner : Step 4 Turning

Turning is pretty simple, Heel Turns and Toe Turn

Heel Turns
To make a heel turn, lean on your heels. Bend your knees a little bit more. Once you have turned get your snowboard level again and straighten your self out.

Toe Turn
To do a toe turn act as if you are trying to stand on your toes. This will make you lean. The leaning will make you turn. Once have turned get your board level and straighten yourself out.

Snowboard for beginner : Step 4 Turning

Now that your are comfortable controlling your speed and stopping on both edges you’re ready to start at the top of the run and try linking your first turns. Strap in the same way as before and let yourself start moving across the run on your heel edge, come to a stop and point your board back down the hill and try to stop on your toes, alternate from stopping on your heels and your toes until you can do it without coming to a complete stop between turns.

SNOWBOARD FOR BEGINER
STEP 1 What is Equipments
STEP 2 How to Footing
STEP 3 How to Riding
STEP 4 How to Turning
STEP 5 Little Trick

Snowboard for Beginner : Step 3 : Riding

When riding your snowboard your knees should be bent and your arms should be at your sides. Look straight ahead. Don't lean forward or backward or slouch. Lean on your front foot to gain speed and lean on back foot to go slower.

Before you take the chairlift to the top of your mountain you should work on some of the basics on the beginner slopes first. Most mountains offer a specified learners area or “Bunny Hill” where you can work on your skills without worrying about getting stuck on a pitch that’s too steep or running into more advanced riders that are riding faster than you.

Snowboard for Neginner : Riding
Snowboard for Beginner : Riding

Start near the bottom of the run, where you won’t have to worry about losing control and building up more speed than you can handle. Strap in to your board in a seated position facing down hill, stand up and point your front hand down the fall line. This will turn your board down the hill and you will start moving, let yourself come to a stop as you ride into the flats. Do this several times until you feel comfortable. Try putting yourself back onto your heel edge and come to a stop before you get to the flats. Once you have this mastered try to stop on your toes. See how long you can traverse across the run on both edges before you come to a stop.

SNOWBOARD FOR BEGINER
STEP 1 What is Equipments
STEP 2 How to Footing
STEP 3 How to Riding
STEP 4 How to Turning
STEP 5 Little Trick


Snowboard for beginner : Step 2 Footing

First you have to decide which foot you want to be in front. Deciding is simple. find some ice. Run, then jump putting one foot in front of the other. Whichever foot is forward will be the front foot on your snowboard. You can choose how far apart you want your feet to be.
Your heels should be closer together than your toes.

Snowboard for beginner : Step 2 Footing

Don’t fret if you find yourself frequently adjusting your footing. If you’re new to the sport, it might take a few runs to really determine your ideal stance. Adjust your bindings at home, rather than attempting to do it on the slopes where the screws may be packed with snow and ice.

SNOWBOARD FOR BEGINER
STEP 1 What is Equipments
STEP 2 How to Footing
STEP 3 How to Riding
STEP 4 How to Turning
STEP 5 Little Trick

Snowboarding for Beginners: Step 1 Equipment

What you need to start the snowboarding, as a beginner is sometimes difficult for us to determine what to do first, and how. do not worry to start snowboarding, pay attention to the instructions below and you will enjoy your first experience snowboarding.

Step 1: Equipment

Googles & Helmet , boots, light jacket, Light Pant (note : Morron Snowboard not realy for beginner)
Board is Waxed

A lot of beginners end up trying snowboarding for a year and then giving up. If you aren't so sure that you're going to stick with snowboarding don't buy expensive equipment.
These are some good brands for a beginner snowboarded:
Moment, Limited, Sims, Lamar, Luna, and Burton makes all kind of boards. My board is kinda big, but your bord should range from as tall as your shoulders to your nose.

USE A HELMET
Just use a helmet. Don't say that you don't need because your to cool because you do. If you aren't doing anything extreme you can use a skateboarding helmet.

Coats and pants
Get light stuff to wear or else you will sweat like crazy. You can actually get cheap Volcom stuff off of Amazon. Underneath your snow pant you can wear basketball shorts or pajama pants. NOT JEANS. For big slopes get goggles, but not for the bunny hills.

Bindings
The bindings are very important. Try to avoid plastic straps on your bindings and get rubber instead because the plastic will break.

Boots
These are very important too. Your boots need to be stiff so you don't break or sprain your ankle. You should always check to make sure that you boots fit in your boots.

SNOWBOARD FOR BEGINER
STEP 1 What is Equipments
STEP 2 How to Footing
STEP 3 How to Riding
STEP 4 How to Turning
STEP 5 Little Trick


Mastering the Basics of How To Freestyle Snowboarding.

 
Nothing is more fun than a sunny day with friends in the snowpark. And nothing beats the feeling of doing your first air, landing on your feet, and riding away feeling like you’re the king (or queen) of the world. But, like most things in life, there’s a payoff for all that pleasure. Like the feeling of doing your first air and landing on your ass instead of your feet... or the frustration of ‘nearly’ making a trick every time, but never quite pulling it off.


Well, it’s too late to change your mind now. You’re hooked on snowboarding, and that’s that. All you can do now is hope someone comes along and tells you all the things you need to know, clear and simple, in the right order. It’s your lucky day. From popping your first ollie and mastering the basic pipe, kicker and rail moves, to learning trick names and picking up style pointers, it’s all here: Explained by pro riders, accompanied by a DVD, and best of all... free. Park riding is so much fun... when you know how. Until then, let us be your guide through those tricky

Snowboarding Trick : Air to fakie

Snowboarding Trick : How to Snowboarding Air to fakie
Snowboarding Trick : Air to fakie
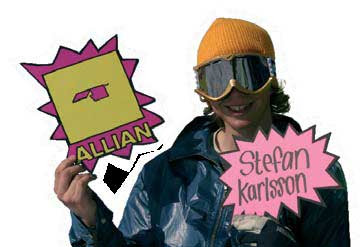
with Stefan Karlsson

How to Snowboarding : Air to Fakie. The air to fakie is one of the basics of halfpipe riding, but it is also one of the hardest to do really well. They can be done on either wall, but most people start off with learning them on the frontside wall – although you will be flying blindside (back facing in the direction you are moving), it’s easier to control your takeoff. Start off small with an Indy grab, and as your confidence grows, aim bigger and go for the Melon (backside grab with a forward tweak) – the classic air to fakie style.
Snowboarding Trick : How to Snowboarding Air to fakie

Snowboarding Trick : Air to fakie Tip If you think you popped off the wall too much and are going to land flat, keep boning out the nose to meet the wall, to help you touch down smoother
Snowboarding Trick : How to Snowboarding Air to fakie
Snowboarding Trick : Air to fakie
  • Ride towards the frontside wall with as much speed as you feel happy with.
  • Ride up the wall, weight over your toe edge, gradually becoming flat on your base. It’s important to ride up the wall at the same angle as you would a regular frontside air – don’t go too straight up the wall, you’ll kill your speed.
  • As you leave the pipe, pop off your tail a little, more if the pipe is under vert.
  • Reach behind your front foot and grab backside. When you have the grab, bone out your
    front leg into the platform.
  • While you are in the air, You’re basically travelling blindside – keep looking down between
    your legs at the coping to stay on track.
  • Touch down on your toe edge. As soon as you land, quickly turn your head to set up for the
    next wall.

Snowboarding Trick : How to Frontside 360 (Half Pipe)

Snowboarding Trick : How to Frontside 360 (Half Pipe)
Snowboarding Trick : Frontside 360 Half Pipe
with Andy Monsberger

How to Snowboarding Frontside 360 :  This is the first rotational move to learn in the pipe. It’s easy to do, because you can see where you’re going throughout, and you’re really only rotating 270°. Later, this will be a trick you use to set up for switch moves on the opposite wall, but for now try it as your last hit on the frontside wall.
Snowboarding Trick : How to Frontside 360 (Half Pipe)
 Snowboarding Trick Frontside 360 Tip :: The key to this trick is to hold the board like a frontside air, but keep your head and shoulders facing further round, ready to pull the last 180.
Snowboarding Trick : How to Frontside 360 (Half Pipe)

Snowboarding Trick : Frontside 360 Half Pipe
  • The first part of this move is done exactly like a regular frontside air.
  • Ride up the wall, weight over your toe edge, gradually becoming more flat on your base, and focus on the lip.
  • As you leave the pipe, pop a small ollie, turn your head and shoulders to face down the pipe, a little more than with a regular air.
  • Grab. Frontside or Mute, however you feel more comfortable, while using the other arm to continue a slow rotation.
  • Holding the tweak, start looking down at the lip, and get ready for re-entry.
  • As you re-enter the pipe, quickly swing your tail around to re-enter fakie.
  • Ride out flat-based, then transfer to your toe-edge, ready to line up for the backside wall... switch.


Snowboard Trick : Layback slash

How to Snowboard Trick : Layback slash
Snowboard Trick : Layback slash
with Eric Themel

How to Snowboarding  Layback slash : One of the best things about being strapped to your board is the way it allows you to quickly pull surf and skate moves that would take skaters and surfers years to learn.
The perfect example of this is the layback slash: frontside or backside, in the pipe or on a powder windlip, all you need to pull this off is a full tank of gas and some surf flicks playing in your head.

How to Snowboard Trick : Layback slash
  
Snowboarding Trick : Layback slash Tip: Use your front foot to guide you through the move, and your back foot to do all the slashing.

How to Snowboard Trick : Layback slash

Snowboard Trick : Layback slash
  • Approach the frontside wall on your toeside edge, fast.
  • As you reach the vert section, lean backwards, and start to go into a heelside turn.
  • Drop your trailing hand backwards onto the snow, and at the same time push your back foot out in front of you, so that your board is at 90° and you are stretching out ahead of you, on the heel edge.
  • Tweak out the back leg for extra style. As you feel your speed go, dig in the heel edge and push with your arm to get back up over your board.
  • Ride back down the transition and switch back onto your toe edge.


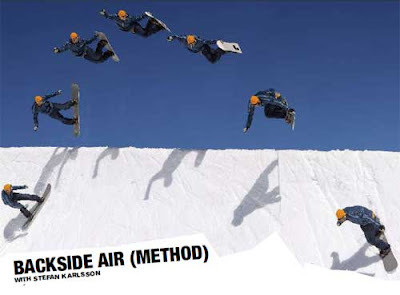
Snowboarding Trick : Backside Air (Method)

Snowboarding Trick : Backside Air (Method)
with Stefan Kar lsson

How to Snowboarding Backside Air (Method). Like frontside’s, the backside air is a move you learn from day one, and spend the rest of your life refining and pushing. The Method air is basically a backside air with extra tweak – old school, but a timeless expression of style. Christian Hosoi perfected them in the eighties on a skateboard, Jamie Lynn did the same on snow in the nineties...and as soon as you’re getting some

How to Snowboarding Trick Backside Air (Method)
 Backside Air (Method) Tip : If the pipe is a bit unpredictable, stay low and relaxed while riding up the wall, you’ll feel the transition better, then stiffen up at the top, ready to pop.
 How to Snowboarding Trick Backside Air (Method)
 How to Snowboarding Trick Backside Air (Method)
 Snowboardng Trick : Backside Air (Method)
  • Getting the line right in the flat bottom is the key to doing this trick right, so you don’t need to turn once you’re on the transition.
  • Head up the transition flat on your base, knees bent, with some weight on the heel edge.
  • If the pipe wall is not steep (under-vert), you need to ollie more off the lip. If it is close to vertical, just ride out without popping.
  • As the board leaves the lip, lean back a little, lift the nose and let the board come to your hand – don’t go to the board.
  • Grab the backside edge with your leading hand. I f it feels right, tweak it out by pulling the board in with your hand, and pushing out the back foot.
  • Spot your landing. Pull your board back in underneath you, release the grab, and extend your legs to meet the top of the transition.
  • Land flat based with weight over your toe edge, and ride away clean.

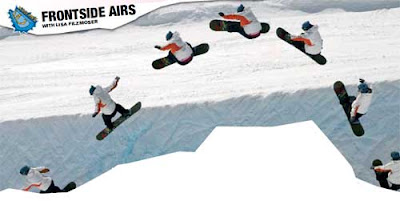
Snowboarding Trick : Frontside Airs

How to Snowboarding Trick Frontside Airs
Snowboarding Trick : Frontside Airs
with Lisa Fi lzmoser

How to Snowboarding Frontside Airs, The best thing about frontside airs is that they’re such an easy trick to learn, and once you’ve got them, you spend the rest of your life finding new ways to do them, new places to try them, and new heights to take them. Here, we
How to Snowboarding Trick Frontside Airs
Snowboarding Trick : Frontside Airs Tip :  Lean back slightly as you take off to keep your weight inside the pipe. How hard to pop the ollie at takeoff depends on the vert (steepness). More vert = less pop.
How to Snowboarding Trick Frontside Airs

Snowboarding Trick : Frontside Airs
  • Decide your line on the flat bottom, and stick with it. Aim to leave the pipe at around 45° from vertical.
  • Approach the frontside wall with as much speed as you feel happy with.
  • Ride up the wall, weight over your toe edge, gradually becoming more flat on your base, and focus on the lip.
  • As you leave the pipe, pop a small ollie, turn your head and shoulders to face down the pipe, and pull your feet up in front of you.
  • Grab frontside, and straighten out your front leg.
  • Holding the tweak, start looking down at the lip, and get ready for re-entry.
  • Pull your front leg back in, and touch down on the pipe wall. Aim to land just below the lip.
  • Ride out flat-based, then quickly transfer to your heel-edge, ready to line up for the backside wall...

Snowboarding Trick : Droping In

Snowboarding Trick : How To Snowboarding Droping In
Snowboarding Trick : Droping In
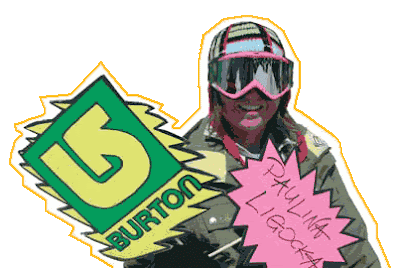
with Paulina Ligocka

How To Snowboarding Droping In, While not a trick as such, dropping in is one thing that has to be mastered before much progress is made: it is the key to understanding transition, and how it can give us extra speed.
There are two ways to ride into a halfpipe – backside or frontside. First to learn is backside, because it’s a) easier, and b) sets you up for a frontside air onyour first hit.

The mistake most riders make is ‘dropping’ when they should be ‘riding’ into the transition.
They jump away from the wall and land with a bump halfway down the transition, which
puts them off balance and kills speed.
Snowboarding Trick : How To Snowboarding Droping In
Snowboarding Trick : Droping In Tip
Picture in your mind how you’re going to hug the wall of the pipe as you go down, and squeeze speed as you leave.
Snowboarding Trick : How To Snowboarding Droping In
 Snowboarding Trick : How To Snowboarding Droping In

Snowboarding Trick : Droping In
  • Select a spot without too much vert or bumps in the transition.
  • Ride along the lip to build up a little speed, and spot your entry point.
  • Lean into the pipe and pop a little ollie, pulling your knees up high to enter the pipe
    well tucked.
  • As soon as your weight is fully inside the pipe, extend your legs to meet the pipe wall.
  • Ride down the wall compact, and as you hit the transition, push with both feet to pump, then, staying on your toe edge, set up for a frontside air.

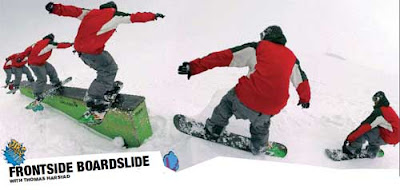
Snowboarding Trick : How To Snowboarding Frontside boardslide

Snowboarding Trick : How To Snowboarding Frontside boardslide

Snowboarding Trick : Frontside boardslide
with Thomas Harstad

How To Snowboarding Fronside boardside, Frontside boardslides are THE classic rail trick, reason being they are the simplest, most stylish way to get down a rail, period. As for difficulty... this is one to try when you’re comfortable with boardslides and nose slides.
Snowboarding Trick : How To Snowboarding Frontside boardslide


Snowboarding Trick : Frontside boardslide Tip
It’s the sliding position that needs loads of practice – do frontside butters everywhere.
Snowboarding Trick : How To Snowboarding Frontside boardslide
 Snowboarding Trick : How To Snowboarding Frontside boardslide

Snowboarding Trick : Frontside boardslide
  • Approach the rail straight on, or slightly from the side, shoulders parallel to the board.
  • As you reach the take-off, pop a small ollie, and focus on your landing point on the box.
  • Turn the board backside, aiming to land on the rail at 90°, while keeping your shoulders in line with the rail – basically like a backside shifty.
  • Land, weight centred over the board, or slightly more on the front foot.
  • Keep looking down the rail, at the same time tweaking the board in the opposite direction with your feet.
  • Keeping your head and shoulders facing down the rail will help your balance, and help you ride out clean.
  • As you leave the rail, counter-rotate your shoulders and hips to ride out facing forwards.
Snowboarding Trick : and How To Snowboarding
Snowboarding Trick : Jibs
How to 50-50How to Bomb Drops
How to BoardslidesHow to Rock to Fakie
How to Frontside Boardslide

Snowboarding Trick : How To Snowboarding Frontside boardslide Video


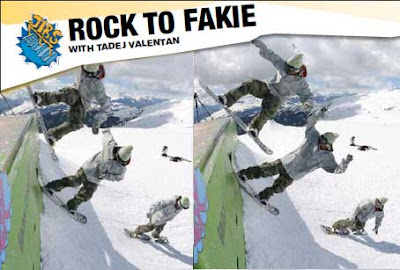
Snowboarding Trick : Rock to fakie

How to Snowboarding  Trick : Rock to fakie
Snowboarding Trick : Rock to fakie
with Tadej Valentan

How to Snowboarding Rock to Fakie, this is pretty much the first trick to try on a wall ride. You start out just sliding a little way, straight up and down. As your confidence increases, work up to the coping. Once you have it, try hitting the wall at a slight angle, and sliding along the coping.

How to Snowboarding  Trick : Rock to fakie
 
Snowboarding Trick : Rock to fakie Tip :
Shoulders parallel to your board, and stay flat on your base at all times.

How to Snowboarding  Trick : Rock to fakie

How to Snowboarding  Trick : Rock to fakie


Snowboarding Trick : Rock to fakie
  • The most important thing is to get the speed right: enough to reach the coping, plus a little more to ‘rock’ your weight over the top.
  • Approach the wall flat on your base, and keep your eye on the coping.
  • As your foot passes the coping, start to straighten out your front leg.
  • Aim to stop with the middle of your board on the coping, then lean forward to rock over the top.
  • Keep your shoulders parallel to the board, and your eyes on your feet.
  • To complete the move, do everything in reverse, riding back down fakie.
  • Keep your eyes on your feet, and as soon as you touch the snow, turn your head to face the direction you’re travelling.

Snowboarding Trick : Bomb Drops

Snowboarding Trick : Bomb Drops
with Paulina Ligocka

How to Snowboarding a Bomb Drop, basically Bomb Drops means dropping from a stationary standing position to the ground below. As well as being fun and challenging, they also come in handy if you ever find yourself stuck above a rock band in the backcountry. Or in a burning building.
Snowboarding Trick : Bomb Drops

Snowboarding Trick Bomb Drops Tip :
 Be confident. If you lean back too much out of fear you’ll take all the impact on the back leg, so keep your weight centred.
Snowboarding Trick : Bomb Drops

Snowboarding Trick : Bomb Drops

Snowboarding Trick : Bomb Drops
  • Find a good spot: make sure the ledge you are standing on is stable and has some traction, so you don’t slip as you jump off. Also make sure the landing has a little transition to land in.
  • Look down and focus on the spot you’re aiming for. Visualise the take-off, drop, and landing.
  • Get down low, lean a little bit forward, and push equally off both feet.
  • Pull your feet up into your body, keeping your eyes on the landing spot at all times, and grab.
  • As you’re coming in towards the landing, extend legs to meet the ground, and get ready to absorb the shock of landing flat.
  • Land, soak up the impact, and ride away.

Snowboarding Trick : 50-50’s

Snowboarding Trick : 50-50’sSnowboarding Trick : 50-50’s
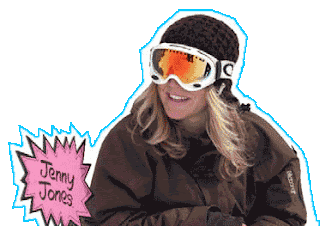
with Jenny Jones

To the rookie park rider, rails and boxes are the scariest thing ever. But don’t worry, they aren’t half as dangerous as they look. Most snowparks have at least one small, wide box for you to build confidence on, and master the basics.
How To Snowboarding 50-50's, The 50-50 is one of the building blocks of jibbing, and describes riding along an obstacle with both feet directly over the rail. It’s usually the first thing you will try on a jib, as you are basically just riding over it.
Snowboarding Trick : 50-50’s


Snowboard Trick - 50-50’s Tip :
Stay smooth and loose getting onto the rail, and keep your shoulders parallel to the rail as you slide.

Snowboarding Trick : 50-50’s
 Snowboarding Trick : 50-50’s

Snowboard Trick - 50-50’s
  • The most important thing is to be balanced on the take-off, so check the run-in and kicker is flat and smooth.
  • Approach the obstacle with medium speed, and an “I can do this” attitude.
  • Keep your shoulders parallel to the board, and ride straight towards the box – no speed checking.
  • At the take-off, pop a small ollie, just high enough to make it onto the box.
  • Land on the box and focus on the end, this will help you reach it!
  • Relax, knees bent, and keep your shoulders parallel to the rail. This will keep you straight.
  • Lift your nose slightly as you ride off the end, and land centred and flat on your base.


Support : Creating Website | Johny Template | Mas Template
Copyright © 2011. Top 10 Snowboard - All Rights Reserved
Template Created by Creating Website Published by Mas Template
Proudly powered by Blogger